
Well. We finally did it. We used every single formation in Footium! It took a while but we did it. What did we learn? What mistakes did we make? Find out more below!
Logistics
Taking this on proved to be a much bigger task than we initially expected! With the Club we were using, Marrouck Villa, specialised to play 4-5-1DM, we had to make a lot of additions in terms of players to be able to use all 29 Footium Formations.
These games were played across a combination of Division 6 and Division 7, with us foregoing our own chance of winning titles to make sure we could try this out for you all.
In every match we made sure to track the result, the lineups of both teams and any mentality/subs changes that we made. All of these were inputted into the spreadsheet!
Statistics – Results
Below is the spreadsheet showing every single result from these matches!
For some clarity:
Squad Ratings: Average of the Starting 11 (or all players used).
Squad Difference: How much better (or worse) our squad was when compared to our opponents.
Colours: For results, it’s pretty self explanatory. Green = Win, Yellow = Draw, Red = Loss. For squad difference, Green = Average Squad Rating 3+ better than opponents, Yellow = Average Squad Ratings within 3 of each other, Red = Average Squad Rating 3+ worse than opponents.

So a lot to look at here!
Results: Won 5, Drew 13, Lost 11. This was 28 points out of a possible 87. Just under 1 PPG.
Squad Difference: 3+ better 7 times, within 3 of each other 19 times, 3+ worse 3 times.
Formations opponents used:
- 4-1-2-1-2WB – 1 time.
- 5-2-3 – 10 times.
- 4-2-3-1 – 1 time.
- 3-1-4-2 – 1 time.
- 5-4-1DM – 2 times.
- 4-4-2 – 2 times.
- 5-2-3A – 4 times.
- 4-3-3 – 1 time.
- 4-3-3A – 3 times.
- 4-3-3H – 1 time.
- 4-2-3-1DM – 1 time.
- 4-5-1DM – 1 time.
- 4-3-3F9 – 1 time.
Formations we never faced:
- Back 3’s. 3-4-3, 3-4-3A, 3-5-2, 3-4-1-2.
- Back 4’s. 4-4-2H, 4-1-2-1-2, 4-5-1, 4-2-3-1N, 4-1-4-1, 4-3-3D, 4-3-1-2, 4-2-2-2, 4-2-2-2WB.
- Back 5’s. 5-3-2, 5-4-1, 5-2-1-2.
Even though it looks like we didn’t face many of the back 4’s, we actually only face a back 3 once, and only faced 1 of the 5 formations that use a back 3. Perhaps indicative of an interesting trend?
Biggest Squad Rating Advantage: 7.8, we won 3-2 using 3-4-1-2 vs 3-1-4-2.
Biggest Squad Rating Disadvantage: -5.7, we lost 1-6 using 4-2-3-1N vs 4-3-3H.
Our Average Squad Strength: 41.2
Opponents Average Squad Strength: 40
Biggest Win: 3-0 (3 times).
Biggest Loss: 6-0.
Statistics – In Game
Below is the formations we used and the in game stats they had.
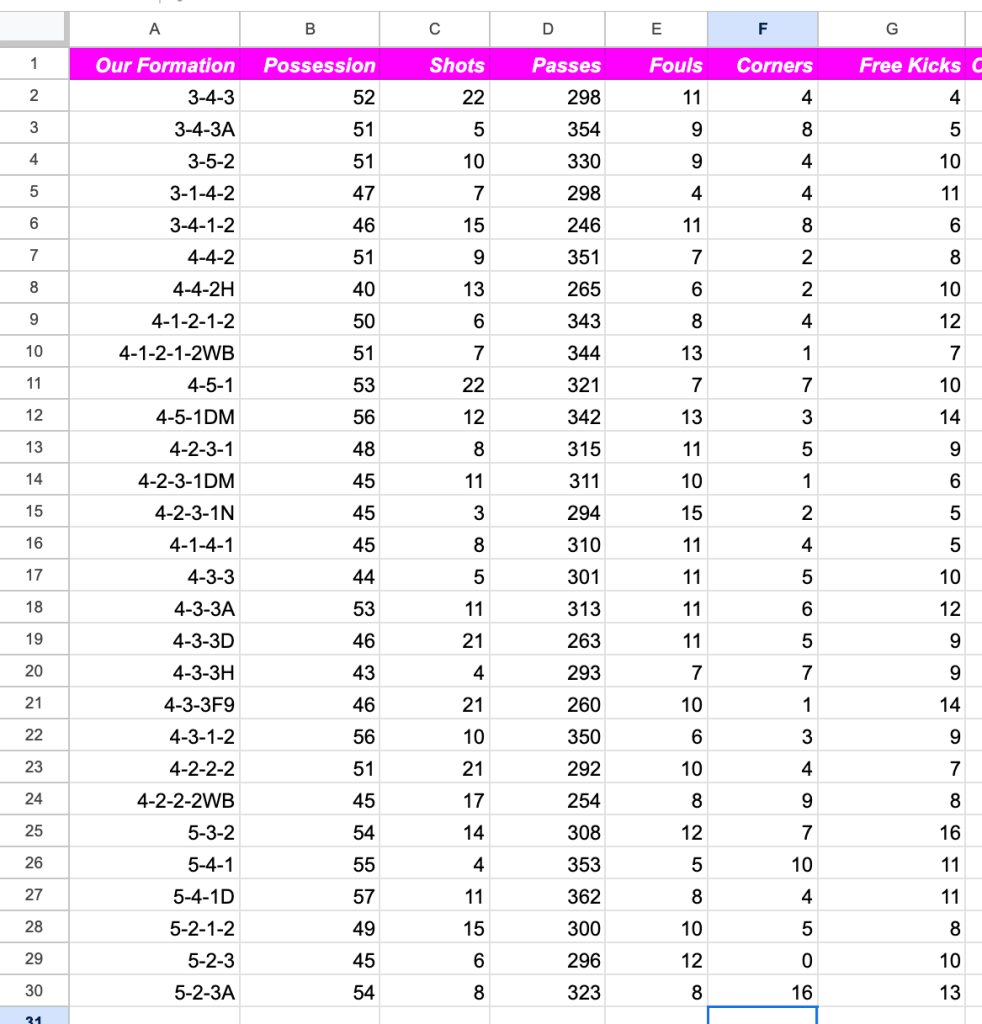
And some highlights of each!
- Possession: Average 49.28%, High 57% using 5-4-1D, Low 40% using 4-4-2H.
- Shots: Average 11.24, High 22 using 3-4-3/4-5-1, Low 3 using 4-2-3-1N.
- Passes: Average 310, High 361 using 5-4-1D, Low 246 using 3-4-1-2.
- Fouls: Average 9.45, High 15 using 4-2-3-1N, Low 4 using 3-1-4-2.
- Corners: Average 4.86, High 16 using 5-2-3A, Low 0 using 5-2-3.
- Free Kicks: Average 9.28, High 16 using 5-3-2, Low 4 using 3-4-3.
Lots to look at here!
Formation Deep Dive
Whilst we only used each formation once, vs one opponent, it’s quite interesting to think about any learnings and trends we can pick out from this.
Whilst I initially set the squad rating difference of 3 as a bit of an arbitrary measure, it proved to be quite indicative. There was an advantage of 3+ for average player ratings across a squad on 10 occasions.
Of the 7 times we had an advantage of over 3, we won 3 and drew 4. 13 points from a possible 21.
Of the 3 times we had a disadvantage of over 3, we lost 3. 0 points from a possible 9, scoring 1 and conceding 15.
Back 5’s.
Whether statistically significant or not, it’s worth knowing that we didn’t win any game where we used a back 5. We drew 2 and lost 4.
However, we played AGAINST a 5-2-3 variant on 14 occasions.
Our results against 5-2-3 across 10 games were Won 2, Drew 3, Lost 5.
Our results against 5-2-3A across 4 games were Won 0, Drew 3, Lost 1.
The two formations that beat 5-2-3 for us were 3-1-4-2 and 4-3-3F9. Both formations with wingers?
It’s also interesting to see just how popular 5-2-3 variants are in Footium.
Back 3’s.
Perhaps interestingly, the formations with a Back 3 were the best performing block of formations.
We had 2 wins, 2 draws and a loss from 5 matches.
Back 4’s.
There is a huge variety of formations using Back 4’s in Footium, so difficult to draw conclusions from this data set.
However, I was quite curious about how variants of the same formation would affect things. If you look at 4-3-3 and its variants, for examples, there are HUGE swings in stats and performance.
Overperforming and Underperforming.
It’s hard to draw direct conclusions about what the under and over performances are across these formations, but I think when a formation has a significant advantage in terms of squad strength but still loses, this is a key indicator. Or we’d be looking at formations that are quite evenly matched in terms of squads, but one where the team gets battered!
- 4-4-2 vs 5-4-1DM. Our 4-4-2 had a squad rating of 0.5 better in this game vs 5-4-1DM, but we lost 0-3.
- 4-5-1 vs 5-2-3. Our 4-5-1 had a squad rating of 3.6 better in this game vs 5-2-3, but it was a 2-2 draw.
- 4-2-3-1DM vs 4-4-2. Our 4-2-3-1DM had a squad rating of 3.6 better in this game vs 4-4-2, but it was a 1-1 draw.
- 4-3-3 vs 5-4-1D. Our 4-3-3 had a squad rating of 0.7 better vs 5-4-1D, but we lost 0-3.
- 4-2-2-2 vs 4-5-1DM. This one was crazy! We had a squad rating of 7.1 better than the 4-5-1DM we faced, yet it was only 2-2.
- 4-2-2-2WB vs 4-3-3A. We had a squad rating of 0.9 better only, but used 4-2-2-2WB to beat 4-3-3A 3-0!
These are some of the key ones to pick out from the list for sure.
What now?
Well. I hope you’ve learned something! We certainly did!
Maybe this gives you some inspiration to try new things.
Maybe it shows you’re heading in the right direction.
Maybe it shows we’ve got too much time on our hands!
However, we will still see you on the pitch!


Leave a comment